Saturday, March 17, 2012

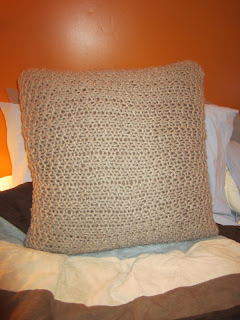
Big Knit Pillow

I had never really thought of knitting a pillow before but the idea came to me when I was thinking about what I could make for a photographer friend who has been taking our family photos as a favor.  I wanted to make him something that could be used in his studio as a prop.  I liked the idea of knitting a pouf but those are more of a seat and he photographs a lot of babies so I thought a giant pillow would be better to let the babies climb on.  I liked the idea of a chunky knit to provide texture to the photos and I also had to consider a neutral color that would be able to go with almost anything. I didn't want to do an intricate pattern that might come off as too masculine or mature.  I like to get creative and funky with my knits but I had to consider the purpose of this pillow and it had to be something that everyone could like. I chose Montana Super Bulky yarn in color 011.  This yarn is 100% unprocessed wool roving and the natural colors are created by the sheep's own coats.


You will need:
3 skeins of Super Bulky yarn
Size 19 straight knitting needles
24"x 24" pillow
1 square yard fabric
yarn needle
sewing needle
thread to match fabric
straight pins

Gauge= 3 stitches per inch

Pattern:
CO 74
K2, P2 for 62 rows
BO

Fold the knit in half and sew 2 sides together with the bulky yarn.  Set this pouch aside until the fabric pillow case is complete.

Fold the fabric in half so the part that will be on the outside is inside.  Sew one of the sides and then stuff the pillow in the corner you have created.  Making sure the fabric isn't pulled tight, pin the opposite side from the seam you just sewed.  Remove the pillow and sew the seam you just pinned.  You should now have a pouch for the pillow.  Stuff the pillow into the pouch, fold each of the open flaps inward and sew them together.

I find sewing to be quite tedious and it really just isn't my thing. However, I hand sewed this pillow case and it only took about 30 minutes to complete even though my sewing skills are mediocre at best.  You don't have to have perfect seams or stitches since you will hardly see this case from the outside.  Hints of the fabric will show through the chunky knit but the details of the seams will not be visible.


Now you will stuff the pillow into the knitted pouch, taking care to fit the pillow snug into the corners of the knit and also ensuring that the knit is evenly stretched over the pillow.  Using yarn sew the opening closed and your pillow is complete! This pattern is very simple and the pillow came out beautiful.


Copywrite Material: This pattern may be used to make gifts or donations but you cannot sell items made from this pattern.  You cannot sell this pattern.  This pattern cannot be reproduced, rewritten, or reposted anywhere.  Feel free to link to this pattern if you would like to share it. Happy knitting!

Tuesday, March 13, 2012

Fusion Newborn Bomber Hat

There are so many babies everywhere!!! I can't knit hats fast enough!  This bomber is for a friend who is pregnant with a boy due the end of March.  They live in Colorado and I'm hoping that it's cold enough there for him to get some wear out of it.  I will add photos of him in it as soon as I get some but for now the hat will be modeled by a bear.


For this project you will need:
 Size 6 (4mm) double pointed knitting needles
Size F crochet hook
3 colors worsted weight acrylic yarn
yarn needle
2 buttons
Stitch marker

Ear flaps (make 2 with main color)
CO3
K1, MK1R, K1, MK1L, K1
Purl across
K1, MK1R, knit to last stitch, MK1L, K1
Purl across
Continue with this pattern until there are 15 stitches on the needle.  End with a purl row.

Main Hat:
CO9, knit across 15 from one ear flap, CO16, knit across 15 from other ear flap, CO9 (total of 64 stitches)
Join in the round taking care not to twist your stitches. Place stitch marker.
K 3 rows in main color
K2 rows in second color (Don't worry about jogs in the stripes since the seam will be covered by the bomber flap)
K3 rows in third color
K2 rows in second color
K in main color until the hat measures 8 cm (not including ear flap)

Decrease:
[K6, K2tog] repeat to end of round
K across row
[K5, K2tog] repeat to end of round
K across row
[K4, K2tog] repeat to end of round
K across
Continue with this pattern until the last round is K2tog around
Sew yarn through the last stitches, tie knot and sew in all loose ends

Finishing:
With the size F crochet hook, using the secondary color of yarn, single crochet across the 18 stitches on the front of hat (the side with the stitch marker).  Single crochet back and forth until flap measure approx. 5cm. Tie off.  Using the third color yarn, start at the tip of an ear flap and single crochet around the frame of the hat including the outside of the bomber flap.  You should end at the tip of the ear flap where you began.  Tie ends together and weave in.  Sew the two buttons to the top corners of the bomber flap to secure it to the main hat.


Copywrite Material: This pattern may be used to make gifts or donations but you cannot sell items made from this pattern.  You cannot sell this pattern.  This pattern cannot be reproduced, rewritten, or reposted anywhere.  Feel free to link to this pattern if you would like to share it. Happy knitting! 

Wednesday, March 7, 2012

Ravyn Bomber

Ravyn is my best friend's daughter and she turned 10 years old this month.  I asked her what kind of hat she wanted me to make for her birthday and so this hat was designed by her.  She loves purple and black and wanted a bomber hat with long braids and owl buttons.  I found these owl buttons on etsy and they are perfect for the hat.  The hat looks so cute on her!

Ravyn Youth Bomber


You will need:
2 colors of worsted weight yarn
Size 9 circular needles
Size 9 double pointed needles
Size G crochet hook
two buttons
darning needle

Ear flaps (make 2 using main color) 
Use size 9 dpn

CO 3 stitches
K1, MK1R, K1, MK1L, K1
Purl across row
K1, MK1R, K to last stitch, MK1L, K1
Purl across row
Continue with this pattern until there are 19 stitches on the needle

Main hat
Use Size 9 circular needles

CO 11 stitches, K across 19 stitches from ear flap, CO 20 stitches, K across 19 stitches from other ear flap, CO 11 (You should have a total of 80 stitches)

Join in the round and use a stitch marker to mark the start of the round.
Knit 10 rows in main color
Knit 2 rows in contrast color (Don't worry if there are color jogs.  The bomber flap covers this seam!)
Knit in main color again until the main hat (not including ear flaps) measures 12 cm

Decrease rows for the crown of the hat


[K8, K2tog] repeat until end of round
Knit across
[K7, K2tog] repeat until end of round
Knit across
[K6, K2tog] repeat until end of round
Continue in this pattern until the last row is K2tog for the round
Using a darning needle sew yarn through the last stitches, tie knot and weave in all loose ends

Finishing


Hat trim:  With the size G crochet hook, single crochet from ear flap to ear flap so that you end where you         started.

Bomber flap: Using the 22 stitches on the front side of the hat (the side with the stitch marker), double crochet across the row, turn and double crochet back.  Continue rows of double crochet until the bomber flap measures approx 8 cm.

Bomber flap trim: Slip stitch into the first stitch of the bomber flap then [CH3, slip stitch] up the side of the flap.  From the top corner [CH3, skip stitch, slip stitch] across the top of the flap.  Finish the other side by [CH3, slip stitch] down the other side.

Buttons:  Sew buttons to the top corners of the bomber flap to affix it to the hat.

Braids:  Cut 12 strands of each color of yarn 80 cm (24 strands total).  You will use 6 strands of each color for each ear flap.  Using the darning needle, thread the 6 strands of each color through the end of the ear flap. Divide the yarn into three sections.  There should be 4 strands of each color in each of the three sections.  Braid to the bottom.  Using a piece of main color yarn around 20 cm tie a knot at the bottom of the braid and wrap the excess yarn around.  When there is only a bit left tie a triple knot and use your crochet hook to pull the knot to the back of the wrapped area and put the ends in with the tassel at the end of the braid.  When both braids are done, trim them so they are even.

Here are some pictures of my son Sage, who is two years old (it's a bit big on him) wearing the hat and also Ravyn rockin her new bomber! Happy 10th birthday Ray!


Copywrite Material: This pattern may be used to make gifts or donations but you cannot sell items made from this pattern.  You cannot sell this pattern.  This pattern cannot be reproduced, rewritten, or reposted anywhere.  Feel free to link to this pattern if you would like to share it. Happy knitting! 

Monday, March 5, 2012

Knit Big

I'm so inspired right now! I've stumbled upon some images of people using giant knitting needles to create really amazing chunky projects and I've just got to get into it. Over the weekend I went and bought a pair of size 50 knitting needles. The problem is that there are few yarns available for that size needle. After doing some research, I found that many people use multiple skeins at the same time to create a thicker yarn like in this 2 hour throw pillow tutorial. Lot's people will be getting these for gifts this year!


The chunky knit just looks so cozy!

Source: google.com via Marcie on Pinterest


Source: craftyshannon.tumblr.com via Marcie on Pinterest

My neighbor does wood working and is willing to make me some large needles. I'm thinking 1 1/2 to 2 inches in diameter. I have no idea what size that would even be! I'm looking forward to these adventures in knitting big. I am currently working on a floor pillow that I'm knitting with size 19 needles so I'm working my way up to it. More to come....